Showing posts with label tutorial. Show all posts

Monday, 22 February 2016

Comparing with the previous row using Microsoft Power BI

This is something which has come up recently at work which at first glance seems like it should be straight forward (tl;dr it is when you know how) but if you're new to Power BI or Power Pivot then it's something which takes some thinking about.  Please note that for this post I will be sticking with Power BI, but if you want to see how this can work with Power Pivot then have a look at Dany Hoter's post over at PowerPivot(Pro).

The Problem

Let's say that you have some data, which is spread over time and you want to be able to create a BI visualisation showing how that value changes as a delta from the previous value.

Implementing a solution

To walk through how to do this, in a way which is hopefully easy to follow, I'm going to grab some sample data which is available on-line.  That data is is the Annual Sheep Population in England & Wales 1867 - 1939 (measured in 1000's) from DataMarket.  No idea why I picked sheep populations but there we go.

The goal here is to be able to create a simple chart which can show the sheep population for a given year and the population difference from the previous year (except for 1867 which should show a difference of 0).

So step 1 is to go and download the data, I've opted for CSV for this example but if you want to try another format then go for it.  Once you've downloaded the data fire up Power BI.

Connecting to the data source

Once Power BI has opened hit "Get Data" to connect to your data source and follow these steps:

Getting data into Power BI
  1. Select the CSV connector
  2. Navigate to and open the sample data set from your local machine
  3. Once the preview window has opened select the "Edit" button

Configuring your data source

One of the first things I've done is renamed the query over in the Query Properties section to "sheep", you don't have to do this but it makes things easier to read for me and also makes the screen shots a little less cluttered.

If you look at your data in the Query Editor window and scroll to the bottom you'll see that there are 3 rows which were in the CSV file which aren't part of the data.  To get rid of these select the "Remove Rows" button from the ribbon and then select the "Remove Bottom Rows" option.  When the option dialog appears enter the value "3" and press "OK", this will remove the rows from the bottom of the data set (scroll down and check).

Removing rows from the query
Next we'll rename the columns to "Year" and "Annual Population", the first of these is fine but the second column will need to be changed, do this by right-clicking on the column title and selecting the "Rename" option.  Alternatively you can select the column and use the "Rename" item in the "Transform" ribbon section.

Now right-click on each column title and under "Change Type" select the "Whole Number" option.  This will ensure that we are working with the data correctly, and you'll notice that the year was mostly likely set to "Text" because of the content of the rows we previously removed.

Almost there, now we need to sort the "Year" column in ascending order, you can use the options in the ribbon or click on the drop-down menu next to the column title and select the correct sort option.

Finally we need to add an index column (we'll see why in a bit) to the data source, in the "Add Column" ribbon.  If you don't select any options then the default is to start from zero, which we'll do in this example, but you can choose to start from 1 or a custom value with a custom increment.  You can leave this new column name as Index.

Adding the index column
Now that we've done all of the prep work you can click the "Close & Apply" option under the Home section in the ribbon.

Creating the new population difference column

Back in Power BI we'll need to be under the "Data" section on the left.
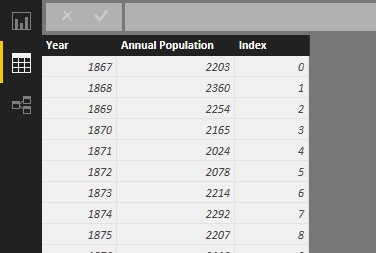
Viewing the data in Power BI
From here add a new column to the data collection by right clicking on the "sheep" (or originally named query if you didn't change it earlier) and selecting the "New Column" option.

Adding a new column to the query
You'll now have a new column imaginatively called "Column" and a query expression editor at the top.  Just to get something for the moment let's enter the following:
Column = SUM(sheep[Annual Population]) 
This will give us a new column called column where every row will now have the sum of the Annual Population column.

Our first new column
As you can see this isn't particularly useful so lets change that expression to something a bit more useful for our purposes.
Population Difference =
'sheep'[Annual Population] - IF(
'sheep'[Index] = 0,
'sheep'[Annual Population],
LOOKUPVALUE(
'sheep'[Annual Population],
'sheep'[Index],
'sheep'[Index]-1)
)
That's quite a lot to take in so we'll break it down a bit and talk through what this is doing.

The first bit is quite simple as we're just saying to take the current sheep population and subtract a number from it.  When we get to the IF statement we're checking to see if the current Index is 0 (I created my Index column to start from zero) and if it is return the current sheep population, this is so that we get a difference value of 0.  If the current index is not zero then we're doing a lookup, with this we're looking up the sheep population value by checking the Index column for a value which is the current Index value less 1 (i.e. the previous value).

If we change our column to this expression we should get the following.

Our data with a population difference value

Visualizing the data

From here we can go back into the Reports section and create a number of visualizations against this data.  Here I've provided an example where I'm using the "Line and Stacked Column Chart" visualization with the annual population for the column values and the population difference for the population difference.  Play around with it and see what looks good for you though.

Visualizing the data

I've provided the data and the pbix file for download if you want to have a look at the version I've put together and play around with it.  Just click on the OneDrive link below.


Coming up next...

One other thing that comes up once in a while is producing a moving value such as a moving average. Next post we'll extend this basic example to show how we can accomplish this.

Friday, 16 December 2011

C++11: Lambda Expressions

Posts in this series
Getting started with C++11
C++11: Initializer lists and range-for statements

So what is a lambda expression?
A lambda expression is way in which to write a function in-line in your code, the typical use case is where you call a function which expects a pointer to another function in order to tailor it to your own needs.  For example, if you had a list of integers (4, 1, 6, 2, 13) and you wanted them sorting, you would typically call a sort method, passing it your list of integers.  Now that sort method may accept a pointer to another function in which you can specify how your list is to be sorted, typically this means that you would have one function defining how to sort in an ascending manner, and another defining a descending manner.  Lets start with an example as to how you would currently do this.
  • bool SortAscending(const int x, const int y)
  • {
  •     return x < y;
  • }
  • ...
  • vector<int> myList = { 4, 1, 6, 2, 13 };
  • sort(myList.begin(), myList.end(), SortAscending); // 1, 2, 4, 6, 13
Full example code

So now, if we wanted to sort this in a descending manner then we would need to write a new method to tell the sort algorithm how to sort the values and pass this to the sort method.

This is a really simple function so why do we have to write a whole method for it?  Well using lambda expressions we no longer have to, with the above being written as follows instead.
  • vector<int> myList = { 4, 1, 6, 2, 13 };
  • sort(myList.begin(), myList.end(), [](int x, int y) -> bool { return x < y; }); // 1, 2, 4, 6, 13
Full example code|

So what did we do here?  Well lets have a look at the lambda expression.
  • [](int x, int y) -> bool { return x < y; }
The opening brackets "[]" is a capture list, more on this later.  Next we define the expressions parameter list "(int x, int y)" just as we would if we were defining a normal method.

The next part is the return type "-> bool", this is an optional part of the expression and we could have easily left it out as the compiler can easily determine from the expression body that the return type is a bool; if the return type is not specified and the expression body does not return any value then a return type of void is deduced.  It is useful, however, to specify a return type if you want to explicitly instruct the compiler what the type being returned should be.

Finally there is the expression body which is every between the "{}" braces.

Capture lists
Sometimes when we use lambda expressions we may want to use or modify values from the surrounding code.  Normally we would just pass these in using a parameter, but with lambda expressions we have to provide a parameter list which the receiving method is expecting, in the case of the sort algorithm method, it is expecting an expression which takes two integers and returns a bool.

To access these surrounding values we can use capture lists.  You've already seen a simple use of a capture list in the previous example where we wrote "[]", this tells the compiler that we are not capturing any values for use in the lambda expression.  In this next example we are going to capture an integer variable called "stepCount" which will be incremented each time our lambda expression is used by the sort algorithm, this will tell us how many times the expression was used to completely sort our list.
  • int stepCount = 0;
  • sort(myList.begin(), myList.end(), [&](int x, int y) -> bool { ++stepCount; return x < y; }); // stepCount is 9
Full example code

The capture list this time is written as "[&]", this instructs the compiler to capture any local variables used in the lambda expression and pass-by-reference.  This allows us to have the sort method update a local variable in our calling code.  Another option for the capture list is "[=]" which tells the compiler to pass-by-value.  If we were to use this in our code however we would get a compiler error as any values passed by value are read-only.

There are other options available for capture lists, these are as follows:

[] Capture nothing
[&] Capture variables by reference
[=] Capture variables by value (make a copy)
[=,&foo] Capture foo by reference, all other variable by value
[foo] Only capture foo and do so by value
[this] Capture the this pointer of the enclosing class

One thing to be careful of here however is that if you return a lambda expression from a method (we'll see how in a second) and you are using a local variable in that method and capturing by reference then you are going to run into problems as the moment you return the expression the local variable you captured as gone out of scope.  Other than that hopefully you can see just how useful these are by now.

Accepting lambda expressions in my own code
One of the great new features in C++11 is the std::function type (and std::bind which I'll cover in a later post) which is a great way for us to start passing around lambda expressions as parameters or return types; in fact it allows us to use lambda expressions and functions.  The structure of the type is std::function<return_type (parameter list)>, so if we wanted to write a method that accepted a lambda expression we could write the following.
  • double Sum(const vector<double>& values, function<double (double x)> f)
  • {
  •     double result = 0.0;
  •     for (auto d : values)
  •     {
  •         result += f(d);
  •     }
  •     return result;
  • }
The "f" parameter is a function which takes a single double parameter and which returns a double value, this is then used in the method body as part of the accumulation process.  The method can then be used as follows.
  • double Complex(double x)
  • {
  •     double result = sin(x * 3.14159265);
  •     result -= floor(result);
  •     
  •     return result;
  • }
  • int main(int argc, char** argv)
  • {
  •     vector myValues = { 1.3, 2.1, 7.4, 9.6 };
  •     
  •     double result1 = Sum(myValues, [](double x) { return x; }); // 20.4
  •     double result2 = Sum(myValues, Complex); // 0.597887
  • }
Full example code

Here we're calling the "Sum" method twice, the first time with a lambda expression which simply returns the value passed into it so that we sum all of the values.  The second call passes a reference to the "Complex" method, which may not be that complex but illustrates the point about being able to pass standard methods as well as lambda expressions.

Lambda expressions provide an easy and convenient method of providing short functions to other other functions which require thema.  Even if you're not sure if you want to use lambda expressions, making sure that your methods use the std::function type means that you can carry on writing helper functions if you want to but that you or others have the option of using lambda expressions if they want to.

For the next post I should be looking at smart pointers, these give us the benefits of pointers in C++ but also provide better memory management, which can only be a good thing

References
CProgramming.com - Lambda Expressions in C++ - the definitive guide
Bjarne Stroustrup - C++11 FAQ

All code provided in this article is provided under a BSD license.  If you spot an error then please do let me know so that we can make this better for anyone else reading it.
Creative Commons Licence
This work is licensed under a Creative Commons Attribution-ShareAlike 3.0 Unported License.

Thursday, 10 November 2011

C++11: Initializer lists and range-for statements

In my previous post I wrote about the auto keyword, using it as a return type and the decltype operator.  Hopefully you've had a chance to use these and hopefully you've been finding them incredibly useful.  I said that in my next post I would look at initializer lists and range-for statements, so let's get stuck in.

Initializer Lists
Perhaps one of the most annoying things I tend to have to do is create an array or vector and initialize it with some known values, if it's held in configuration then it's not too bad but I still end up having to do it sometimes.  Previously if you've wanted to just use an array this has been fairly trivial, we'd just write the following:

int a[] = { 1, 2, 3 };

But if we wanted to use a vector then we'd end up with 4 lines of code to do the same job:

vector<int> a;
a.push_back(1);
a.push_back(2);
a.push_back(3);

Which isn't particularly nice to write and can lead to RSI related injuries.  But now functions (including constructors which are referred to as an initializer-list constructor) can accept a {} list by accepting an argument with the type std::initializer_list<T>.  This has been pushed into the STL so our favourite containers should now accept a {} list for initialization.

vector<int> a = { 1, 2, 3 };

map<int, vector<string>> c({ 
    {1, { "Ignoring", "The", "Voices" } },
    {2, { "In", "My", "Head" } }
});

Doesn't that just look a lot better, and it's certainly easier to type.  The nice thing about this new type is that it means we can write our own functions which take initializer lists, whether we're creating our own container class or just writing a function which can accept a {} list of values.


template<class T> void MyFunction(initializer_list<T> values)
{
    cout << "Number of items in initializer list: " << values.size() << endl;
    for (auto i = begin(values); i < end(values); ++i)
    {
        cout << *i << " ";
    }
    cout << endl;
}

This method then works by simply calling it in the following manner:

MyFunction<int>({ 1, 2, 3 });

Now you may have noticed something different with the for loop in that method, instead of using "values.begin()" and "values.end()" it's using "begin(values)" and "end(values)".  These are two stand-alone methods which return iterators to the beginning and end of the of the collection; the nice thing about these methods is that they work on any structure which works in a similar way to STL iterators (i.e. implements operator++, operator!= and operator*), which means that they won't work on dynamic arrays.

Full example Code

Range-For Statements

If you're use to working in languages such as C# or Python then the chances are you're use to seeing statements like these:

C#: foreach (int i in my_list) { ... }
Python: for i in my_list: ...

These are statements which  provide a simple syntax for working with each item in an iterable structure.  To perform something similar in C++ we would write something more like this:

for (vector<int>::iterator it = my_list.begin(); it != my_list.end(); ++it) { ... }

Which works and it does what we want it to, but secretly we've been looking over the shoulders of the C#, Java etc... developers and coveting their range loops.  Well not any more, now we too have a range loop which works on any iterable structure (i.e. anything you can iterate through like an STL-sequence defined by a begin() and end(), [1]), including initializer lists.

for (auto i : my_list) { ... }

So to give a more complete example, and using what we covered earlier we can do the following:

vector<string> a = { "Ignoring", "The", "Voices" };
for (const auto s : a)
{
    cout << s << endl;
}

Full example code

Which just looks a whole lot different from the following which we would have needed to write before hand to accomplish the same thing.

vector<string> a;
a.push_back("Ignoring");
a.push_back("The");
a.push_back("Voices");

for (vector<string>::const_iterator it = a.begin(); it != a.end(); ++it)
{
    cout << *it << endl;
}

The next post I'm planning on doing is about lambda expressions, these are another fantastic language feature which I use a lot in other languages such as C# and Python so I'm glad that they've finally made their way into C++ as well.  As it's a fairly sizable topic by itself I'll probably just a do a single post on those and then single posts for other features as well.  I think that the items I've covered in this post and my last are really the easiest to get going with and which have a fairly large impact on the code we write daily.

References
[1] Bjarne Stroustrup C++11 FAQ

All code provided in this article is provided under a BSD license.  If you spot an error then please do let me know so that we can make this better for anyone else reading it.
Creative Commons Licence
This work is licensed under a Creative Commons Attribution-ShareAlike 3.0 Unported License.

Sunday, 6 November 2011

Getting started with C++11

Wow, has it really been this long since my last post?  It's been a mad few months getting the bathroom and kitchen finished off, dealing with a young child and now baby number 2 only a couple of weeks away.  With all of this going off I've somewhat neglected this blog and it's about time I started putting some articles up.

So I thought I'd try to get back into the swing of things by writing a few brief entries on getting going with some of the new features of the recently C++11 standard.  I've been keeping an eye on the process over the last year and I'm excited by the new features available to us being introduced in newer versions of the compilers.  All of the code I'll be putting up has been written and compiled on a laptop running Ubuntu 11.10 (Oneiric Ocelot) which has GCC 4.6.1 in the repositories (this has a list of the C++11 features available at the various releases), most things are coming along nicely but concurrency is still a way off.

Auto's

Quite possibly the most useful new feature in day-to-day use is the new "auto" keyword - if you know C# then this can be compared to the "var" keyword (which is not the same as the VB variant type) - which can be used in place of specifying a variable type where the type can be inferred by the compiler at the point of declaration.  So instead of typing:

int x = 42;

You can instead use:

auto x = 42;

This means that the compiler will infer x as an integer, after this point x will always be an integer (in the current scope).  This is most likely not something you will do day-to-day (personally I won't be likely to) but then this isn't where it's use shines through, lets instead look at another example:

std::vector<std::string> my_collection;
my_collection.push_back("Hello");
my_collection.push_back("World");

for (std::vector<std::string>::iterator it = my_collection.begin(); it != my_collection.end(); ++it)
{
    cout << *it << endl;
}

So, a simple collection that we then iterate over and write the value out to the console.  So where can the "auto" keyword help here?  Well that for loop is looking pretty doesn't it?  Wouldn't it be nice if there was some way we could tidy it up a little, maybe get it looking a little more like this:

for (auto it = my_collection.begin(); it != my_collection.end(); ++it)
{
    cout << *it << endl;
}

Full example code

And guess what, we can (yay!).  This is because when we declare "it" the compiler can infer it's type so we don't have to clutter up our code specifying the type when we already know what it is.  There is actually a few more things we can do to this example to make it even easier to read with new features but they'll come later.

As a Return Type

Yep, we can use the "auto" keyword in place of a return type as well, how does this work though as we're not specifying a variable, so how do we infer type?  Well we can now specify the return type at the end of the function declaration, so instead of: 

int Sum(int x, int y) { ... }

We can instead use the "auto" keyword and specify the type at the end:

auto Sum(int x, int y) -> int { ... }

Which doesn't look much better does it?  Well again this isn't really the intended use of the syntax, but if this isn't then what is? Well one place is where the type being returned is not known to the compiler at the point of definition.  Consider the following snippet from a header file:

class Test
{
public:
    enum TestEnum { One, Two, Three };
    void SetField(TestEnum t);
    TestEnum GetField();
private:
    TestEnum _field;
};

Implementing the setter is easy in the source file, we just write the following:

void Test::SetField(TestEnum t) { ... }

And for the getter we just write this:

TestEnum Test::GetField() { return _field; }

Dont we?  Well, no actually.  The compiler will return an error as the return type TestEnum is not known to the compiler at the point where we define the return type, to get this to work we would need to do the following:

Test::TestEnum Test::GetField() { return _field; }

Alternatively, using the "autokeyword as the return type and using the new return type syntax we could type the following instead:

auto Test::GetField() -> TestEnum { return _field; }

Full example code

This works because the compiler knows about TestEnum at the point where we now define the return type.  Still this doesn't look like it provides much benefit, but it will when we introduce the final new piece of syntax for this post.

decltype

This is an operator which is used to determine the type of an expression or variable so you can create a variable based on that type, like this:

int x = 3;
decltype(x) y = 5;       // same as int y = 5
decltype(x - y) z = 7;   // same as int z = 7

So far so good but again it doesn't look like it's bringing much to the party.  So what if we do the following instead:

std::map<int, std::vector<std::string>> MyFunction() { ... }
auto MakeCollection() -> decltype( MyFunction() )
{
    auto val = MyFunction();
    return val;
}

Full code example

Take a second, read it again, now think of all those poor keys on your keyboard, don't they deserve a break?  At this point the use of decltype and the new return type syntax and the new auto keyword all should hopefully look really useful and the kind of things you might want to start using a bit more frequently, they did for me when I first figured it out.  The whole thing looks even more appealing when you start considering templated functions as well when sometimes the return type can be more difficult if not impossible to figure out.  Also you are reading that right, I did write ">>" in there, the new specification treats this the way we read it which makes a lot more sense thankfully.

Just for completeness, here's the above snippet of code written using the more traditional syntax:

std::map<int, std::vector<std::string> > MyFunction() { ... }
std::map<int, std::vector<std::string> > MakeCollection()
{
    std::map<int, std::vector<std::string> > val = MyFunction();
    return val;
}

Anyone who says that last snippet is easier to read is either lying or wants their head examining, it's bad enough typing it!  So go on and give these new features a try, if you're not wanting to use them most of the time after a week I'll be shocked.

I'm planning my next post of this type to be about initializer lists and for-range loops, after which I will hopefully look at lamda expressions and smart pointers.  The items discussed above and the ones coming up - I feel - are the first things which makes C++ based on the new C++11 standard feel like a modern programming language and, hopefully, keeps new and experiences programmers coming back to it for years to come.

References
Wikipedia - C++11
CProgramming.com - C++11 articles
Bjarne Stroustrup - C++11 FAQ

All code provided in this article is provided under a BSD license.  If you spot an error then please do let me know so that we can make this better for anyone else reading it.
Creative Commons Licence
This work is licensed under a Creative Commons Attribution-ShareAlike 3.0 Unported License.